How to Replace Old Vent Covers With Modern Vent Covers: Measuring and Installing Tips


Vent covers might seem like small, inconspicuous details in your home, but their impact is far greater than most people realize. From maintaining efficient airflow and improving air quality to whether it’s flush mount vent covers blending seamlessly with your décor, or wooden vent covers adding warmth to traditional spaces the right vent covers can make a significant difference. Yet, many homeowners face challenges—rusting, poor fits, or even noisy airflow—that can make their HVAC systems less effective and their homes less comfortable. In this blog, we dive deep into everything you need to know about vent covers: how to identify when they need replacing, choosing measure them for the perfect fit, and choosing the best materials for your space. Whether you’re tackling a DIY project or looking for ways to enhance your home’s design with a custom vent cover to match your flooring perfectly, these practical tips and solutions will help you take control of your vent cover woes. Let’s uncover how you can transform this overlooked element into a key feature of your home’s functionality and style.

How to Identify When It’s Time to Replace Your Vent Covers

Vent covers play a critical role in your home, from managing airflow to complementing the overall aesthetic. Over time, vent covers can wear out, become inefficient, or even detract from your home’s style. Ignoring damaged or outdated vent covers could lead to reduced HVAC efficiency, uneven airflow, and compromised air quality. Identifying the right time to replace your vent covers ensures your home remains both functional and visually appealing.

Here are some telltale signs that it’s time to replace your vent covers:

  • Rust or Corrosion: Metal vent covers, particularly in high-humidity areas, often show rust or discoloration, which can affect durability and appearance.
  • Cracks or Physical Damage: Cracks, dents, or warped edges may block airflow and make vent covers less effective.
  • Poor Airflow: Rooms that feel too hot or cold may have vent covers that are misaligned or obstructed, reducing the system’s efficiency.
  • Mismatched Design: If your vent covers clash with your flooring or décor, replacing them with matching vent covers can create a seamless look.
  • Age and Wear: Over time, even durable vent covers can become dull or outdated, especially when styles or materials no longer suit modern tastes.

Benefits of Replacing Your Vent Covers

Upgrading to newer vent covers, such as flush mount vent covers or custom vent covers, can dramatically improve both form and function. These options not only enhance the overall aesthetic of your home but also provide better durability, efficient airflow, and easier maintenance. Investing in vent covers that match your flooring, such as wooden vent covers, ensures a cohesive and polished design that complements your space.

Steps to Properly Measure Vent Covers for a Perfect Fit

When it comes to replacing or upgrading vent covers, precision is key. Ill-fitting vent covers can lead to airflow problems, wasted energy, and even noise issues. By taking accurate measurements, you ensure the new vent cover fits seamlessly into the duct opening, enhancing both functionality and appearance. Whether you’re opting for custom vent covers or flush mount vent covers, getting the dimensions right is the first step to achieving a polished result.

Before starting, gather these essential tools:

Measuring Tape: A sturdy tape measure for precise dimensions.

Notepad and Pen: To jot down measurements and notes.

Existing Vent Cover (if available): For comparison and reference.

  1. Measure the Duct Opening:

Remove the existing vent cover and measure the opening’s width and length (not the vent cover itself). Use a measuring tape and note the dimensions in inches.

  1. Check for Depth:

If you’re installing flush mount vent covers, measure the depth of the duct to ensure the new cover sits flush with the floor or wall.

  1. Consider Screw Placement:

For wall or ceiling vents, measure the distance between mounting screw holes to ensure the replacement aligns properly.

  1. Account for Clearance:

Ensure there’s enough room for the vent cover to fit securely without interference from surrounding materials like baseboards or flooring edges.

Tips for Success

  • Always measure twice to avoid errors.
  • Round up fractional measurements slightly to ensure the vent cover fits snugly.
  • If your vent opening is irregular (common in older homes), consider opting for custom vent covers to get the perfect fit.
  • For floors, coordinate the measurements with your flooring type (e.g., vinyl, laminate, or hardwood) to ensure the vent cover complements the overall look.

Common Problems with Vent Cover Installation
(And How to Fix Them)

Installing vent covers might seem straightforward, but improper installation can lead to a host of issues, including poor airflow, noisy vents, and even damage to your floors or walls. The type of vent cover you choose—surface mount or flush mount—also requires specific techniques to ensure a perfect fit. By understanding and addressing common mistakes, you can achieve both functionality and style with your new vent covers.

Common Installation Mistakes

  • For Surface Mount Vent Covers:
  • Improper Screw Placement: Misaligned screws can cause the cover to sit unevenly, creating gaps that disrupt airflow.
  • Failing to Level the Cover: Neglecting to check that the cover is level can lead to a crooked appearance.
  • For Flush Mount Vent Covers:
  • Inaccurate Depth Measurement: Flush mount covers require precise depth measurements to sit perfectly level with the floor or wall. Miscalculations can result in covers that protrude or sink unevenly.
  • Skipping Adhesive or Brackets: Without secure mounting, flush covers may shift or loosen over time.
  • General Mistakes Across Styles:
  • Not Cleaning the Vent Opening: Dust and debris can interfere with a secure fit.
  • Using the Wrong Cover Size: Covers that are too large or small for the duct opening can cause airflow inefficiency or noise.
 

How to Install Surface Mount Vent Covers Perfectly

  1. Align the Cover: Place the vent cover over the duct opening, ensuring it sits evenly on all sides.
  2. Secure with Screws: Use screws that align with the pre-drilled holes, tightening gently to avoid warping the cover.
  3. Level the Cover: Use a spirit level to check alignment before fully securing the screws.
 

How to Install Flush Mount Vent Covers Perfectly

  1. Prepare the Opening: Clean the vent area thoroughly and ensure the depth matches the cover specifications.
  2. Apply Adhesive or Mounting Brackets: For flush mounts, use a strong adhesive or brackets to secure the cover.
  3. Insert and Press Firmly: Align the cover with the opening and press it into place, ensuring it sits level with the surrounding surface.
  4. Test Fit: Check for any gaps or misalignment by running your hand over the surface.
 

Pro Tips for a Seamless Installation

  • Always clean the area around the vent opening before installation to ensure the cover fits securely.
  • For uneven walls or floors, use shims or leveling tools to achieve a flush fit.
  • When in doubt, consult the manufacturer’s guidelines or consider professional installation to avoid costly mistakes.
  • If you’re working with custom vent covers, double-check measurements to ensure a perfect match with your flooring or wall material.

How to Choose the Right Vent Cover Material for Your Home

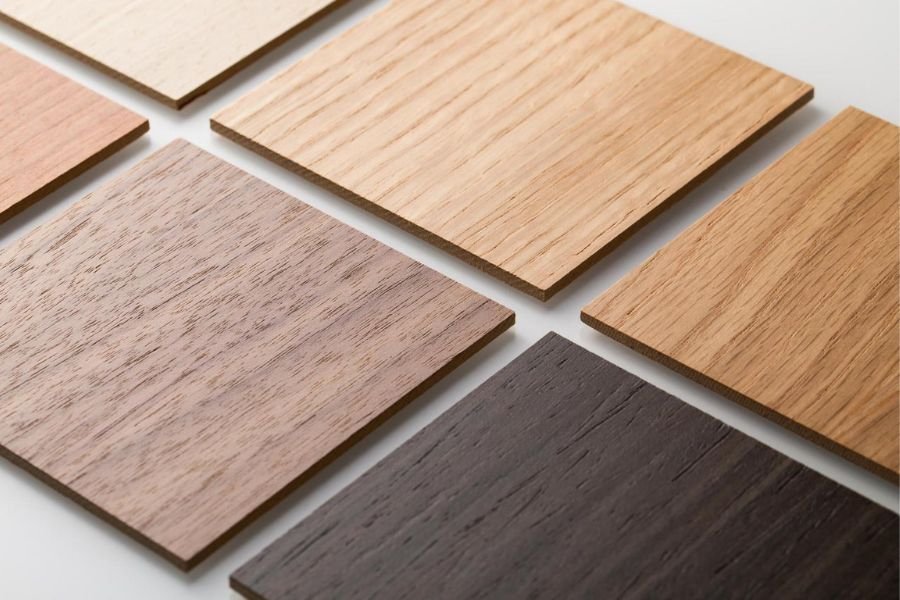
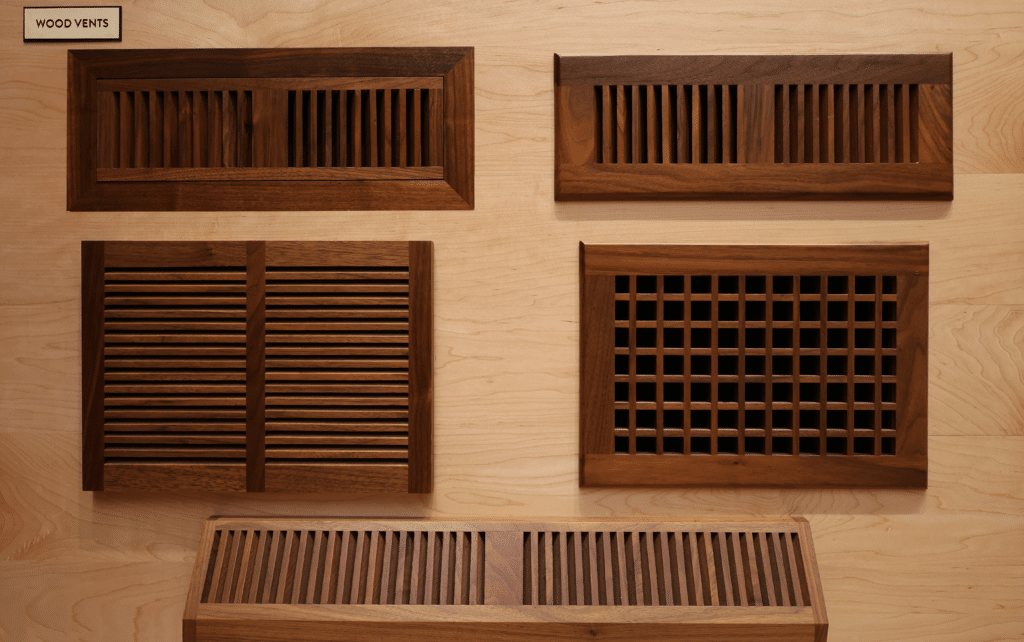
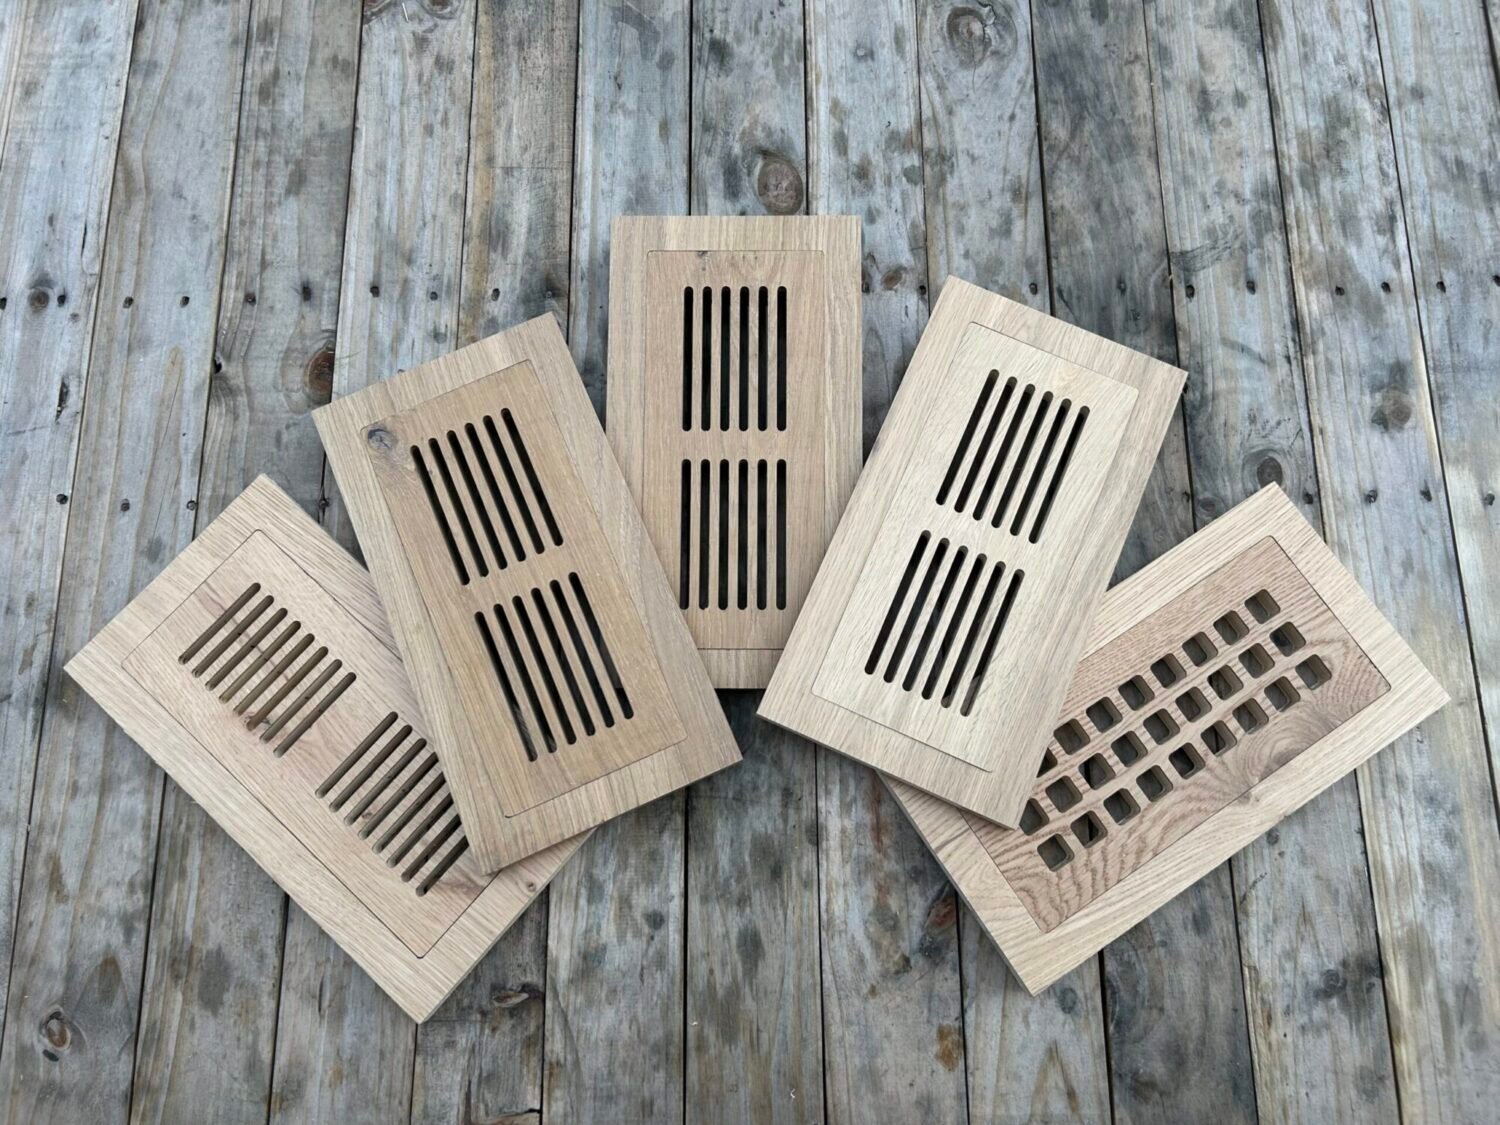
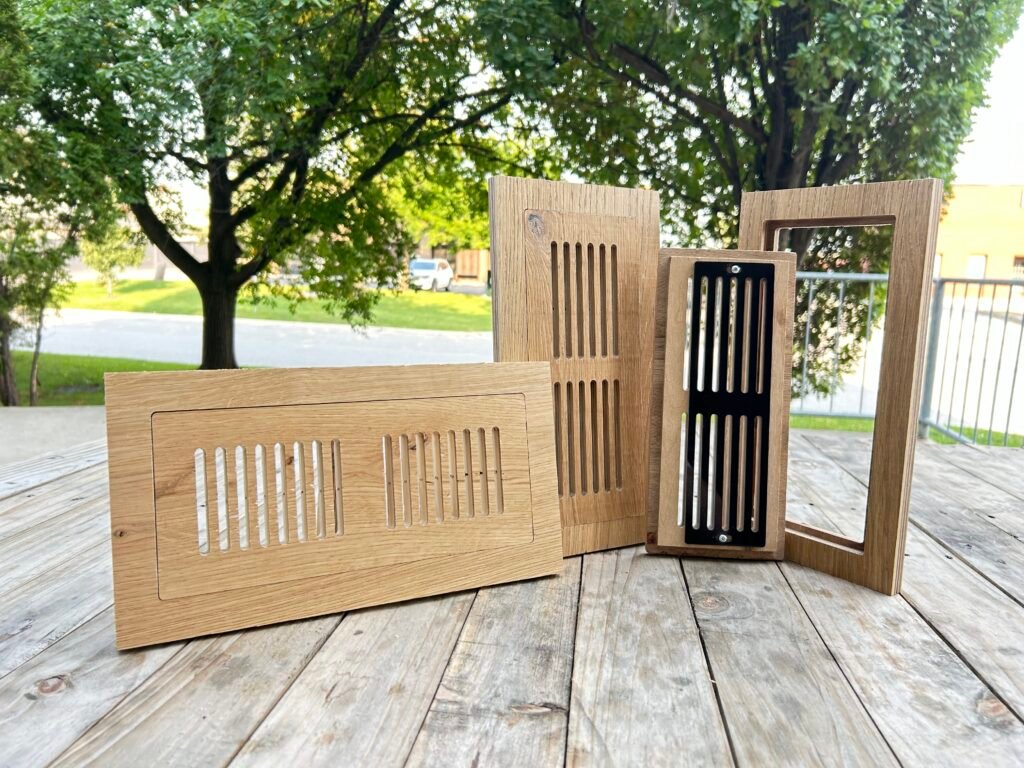
The material of your vent covers is more than just an aesthetic choice; it directly impacts their durability, maintenance needs, and compatibility with your home’s design. Whether you’re considering wooden vent covers for a warm, traditional look or modern options like metal or plastic, choosing the right material ensures your vent covers will complement your flooring and stand the test of time.

Overview of Vent Cover Materials

Here’s a breakdown of the most popular vent cover materials and their pros and cons:

Wooden Vent Covers:

  • Pros: Extremely durable perfect for blending with hardwood, laminate and luxury vinyl flooring, warm and natural aesthetic, can be stained to match floors or custom made from the same material of your flooring and provide a perfect color and texture match.
  • Cons: May require maintenance in high-humidity areas to avoid warping.
 

Metal Vent Covers:

  • Pros: Extremely durable, ideal for modern or industrial interiors, available in various finishes.
  • Cons: Can be prone to rust in humid environments unless treated or coated.
 

Plastic Vent Covers:

  • Pros: Lightweight, resistant to moisture, cost-effective.
  • Cons: Less durable over time and may not match high-end flooring styles.
 

Custom Vent Covers (Available in various materials):

  • Pros: Tailored to match flooring perfectly, versatile in design, great for achieving a seamless look and extremely durable.
  • Cons: May be more expensive than standard options.
 

Factors to Consider When Choosing a Material

  • Durability: For high-traffic areas, opt for materials like durable hardwood.
  • Moisture Resistance: In kitchens or bathrooms, plastic, water resistant vinyl or treated metal vent covers may perform better.
  • Design and Aesthetics: Consider how the vent cover complements your flooring—matching vent covers with flooring creates a cohesive look.
  • Maintenance: Solid wood vent covers may require occasional refinishing unlike their hardwood vent cover competitors and, while metal covers might need protection against rust.
  • Budget: While custom options like flush mount vent covers offer unmatched style, they may require a larger investment.
 

Matching Vent Covers with Flooring

To achieve a seamless design, choose vent covers that match the color, texture, and material of your flooring. For example:

  • Pair wooden vent covers with hardwood or laminate flooring for a natural, consistent look.
  • Optional for custom vent covers when working with unique or exotic flooring materials to ensure a perfect match.
 

Trends in Vent Cover Materials

Modern homeowners are leaning toward flush mount vent covers for their minimalist appeal and ability to sit level with the flooring. Additionally, environmentally conscious buyers are exploring vent covers made from sustainable materials like reclaimed wood or recycled metal.

DIY vs. Professional Vent Cover Installation:
What You Need to Know

The Appeal of DIY Installation

DIY vent cover installation is a popular choice for homeowners who enjoy tackling home improvement projects or want to save on installation costs. With the right tools and guidance, installing surface mount vent covers or even flush mount vent covers can be a straightforward process. However, DIY efforts require precision and attention to detail to avoid common mistakes like uneven mounting or poor fit.

Benefits of Professional Installation

For homeowners who want a flawless finish without the hassle, hiring a professional is often the best choice. Professionals bring expertise in working with different materials, such as wooden vent covers or custom designs, ensuring a perfect fit and alignment with your flooring. Additionally, they can handle challenges like irregular vent openings or uneven surfaces, which are common in older homes. A professional installation guarantees durability and eliminates potential mistakes that could compromise the functionality or aesthetics of your vent covers.

When DIY Installation Makes Sense

  • You have straightforward vent openings with no irregularities.
  • You’re installing surface mount vent covers, which are simpler to align and secure.
  • You have experience with basic tools like screwdrivers and measuring tape.
  • The vent covers don’t require complex modifications or custom fitting.
 

When to Optimal for Professional Installation

  • You’re working with flush mount vent covers, which require precise depth measurements and a level surface.
  • The vent openings are irregular or located in challenging areas like ceilings or high walls.
  • You’re using high-end custom vent covers and want to ensure they’re seamlessly integrated with your flooring.
  • You don’t have the time or confidence to handle the installation yourself.

Whether you choose DIY or professional installation, the goal is to achieve a secure, durable, and aesthetically pleasing result. For simpler tasks like installing surface mount vent covers, DIY may be sufficient. However, for advanced projects involving flush mount vent covers or custom designs, professional help ensures the best outcome.

How to Clean and Maintain Your Vent Covers
for Optimal Performance

Why Vent Cover Maintenance Is Essential

Vent covers play a vital role in maintaining proper airflow and air quality in your home. Over time, dust, debris, and even mold can accumulate, impacting the efficiency of your HVAC system and potentially reducing indoor air quality. Regular cleaning and maintenance of flush mount vent covers, wooden vent covers, and other styles not only ensure they look their best but also help extend their lifespan and improve performance.

Tools and Supplies You’ll Need

Before you begin cleaning your vent covers, gather the following:

  • A vacuum with a soft brush attachment
  • Mild soap or a cleaning solution suitable for the cover material
  • A microfiber cloth or soft sponge
  • Warm water
  • A screwdriver (if the vent cover needs to be removed)
 

Step-by-Step Cleaning Guide for Surface Mount and Flush Mount Vent Covers

  1. Turn Off the HVAC System: This prevents dust and debris from being circulated during cleaning.
  2. Vacuum the Cover: Use the vacuum’s soft brush attachment to remove loose dust and dirt from the surface.
  3. Remove the Cover (If Necessary): For a deeper clean, unscrew the vent cover or lift it out of place (especially for flush mount designs).
  4. Wash the Cover: Soak the vent cover in warm, soapy water. For wooden vent covers, use a wood-safe cleaner and avoid soaking them to prevent warping.
  5. Rinse and Dry: Thoroughly rinse the cover and dry it with a microfiber cloth. For metal covers, ensure they are completely dry to avoid rust.
  6. Reinstall the Cover: Once dry, place the vent cover back and secure it.
 

Maintenance Tips for Long-Term Performance

  • Regular Cleaning Schedule: Clean vent covers every three to six months, or more frequently in high-dust areas.
  • Inspect for Damage: Check for cracks, rust, or loose screws during each cleaning. Replace damaged vent covers to maintain efficiency.
  • Preventative Measures: Use air filters in your HVAC system to reduce the amount of dust reaching the covers.
 

Tailored Care for Different Materials

  • Flush Mount Vent Covers: Pay extra attention to cleaning around the edges to prevent debris from accumulating and affecting the seamless fit.
  • Wooden Vent Covers: Polish them occasionally to maintain their appearance and protect the finish.
  • Metal Vent Covers: Use rust-resistant sprays if they are exposed to high humidity.
 

The Benefits of Clean Vent Covers

  • Improved indoor air quality by reducing allergens and dust.
  • Optimal HVAC performance with unobstructed airflow.
  • A polished and professional look for your home, especially with custom vent covers or designs that match your flooring.

How to Upgrade to Flush Vent Covers for a Modern Look

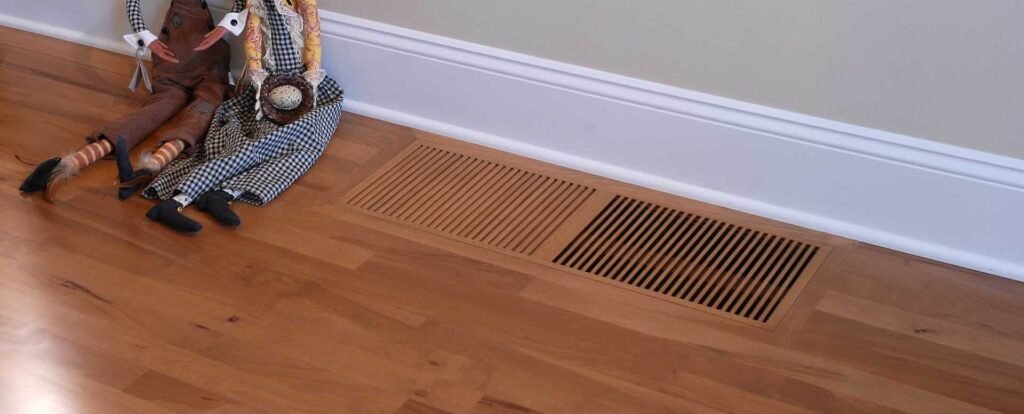
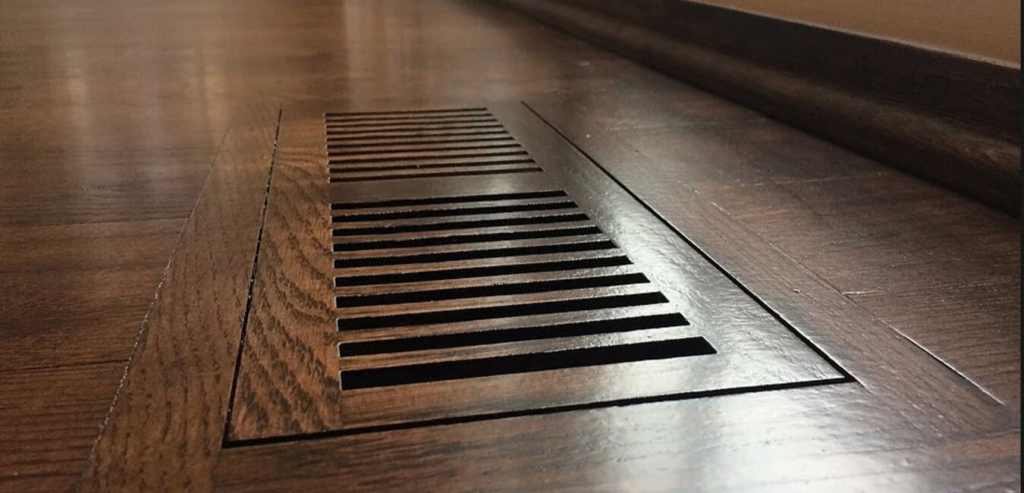
Why Choose Flush Vent Covers?

Flush vent covers are the ultimate choice for homeowners seeking a sleek, modern design. Unlike surface-mounted vent covers, which sit above the flooring or wall, flush vent covers align perfectly with the surrounding surface, creating a seamless and polished look. These covers are especially popular for their ability to blend into hardwood, laminate, or vinyl flooring, offering a minimalist appeal without compromising functionality.

Benefits of Flush Vent Covers

  • Aesthetic Appeal: Flush vent covers integrate effortlessly into flooring or walls, enhancing the overall design and creating a clean, uniform look.
  • Durability: Many flush vent covers are designed to withstand heavy foot traffic, making them ideal for high-use areas like living rooms and hallways.
  • Improved Airflow: Their design ensures optimal airflow by eliminating gaps and uneven surfaces that can disrupt ventilation.
  • Customizable Options: With materials like wood, metal, or composite, flush vent covers can be tailored to match your flooring perfectly.
 

Common Mistakes to Avoid

  • Skipping Depth Measurement: Failing to measure the depth can result in vent covers that protrude or sit unevenly.
  • Poor Adhesion: Without proper adhesive or brackets, flush vent covers may shift over time, disrupting the seamless look.
  • Choosing the Wrong Material: Opt for durable materials like wood or metal for areas with heavy foot traffic, as weaker materials may crack or warp.
 

Matching Flush Vent Covers with Flooring

For a truly integrated design, select flush vent covers that match your flooring material and finish. For instance:

  • Use wooden flush vent covers with hardwood or engineered wood floors for a cohesive appearance.
  • Consider custom vent covers that made from the same material with your flooring if you want to achieve the perfect color and texture match with durability and the long lasting factory finish.
 

The Long-Term Benefits of Flush Vent Covers

By upgrading to flush vent covers, you’ll not only achieve a more modern aesthetic but also improve the functionality and durability of your home’s ventilation system. Their ability to blend seamlessly into the flooring makes them a worthwhile investment for anyone looking to enhance their home’s design while maintaining practical benefits.

Safety Tips for Securing Vent Covers
in Homes with Kids or Pets

 Why Vent Cover Safety Matters in Homes with Kids or Pets

In homes with children or pets, vent covers can pose unexpected risks. Curious toddlers may try to remove covers or drop small objects into the vents, while pets might damage vent covers or even get injured. Ensuring that your vent covers are securely installed and designed for safety is essential to creating a safe environment without compromising functionality or style.

Common Safety Risks with Vent Covers

  • Loose Covers: Vent covers that are not securely fastened can become a hazard, as they may shift, exposing sharp edges or allowing small hands or paws to reach inside.
  • Small Object Hazards: Kids often drop toys or small items into vents, which can block airflow or damage the HVAC system.
  • Pet Interference: Pets, especially cats and dogs, may scratch or chew on vent covers, potentially causing injury or damaging the cover.
 

How to Secure Vent Covers for Safety

  • Flush Mount Vent Covers: Opt for flush designs that sit level with the floor, reducing the chances of tripping or tampering.
  • Use Grille Guards: Install grilles or mesh guards to prevent small objects from being dropped into the vents.
 

Choosing the Right Vent Covers for Homes with Kids or Pets

  • Durable Materials: Choose solid or hardwood vent covers for their durability and resistance to scratches
  • Custom Vent Covers: Consider custom designs that can be reinforced for added safety and match your flooring for a seamless look.
  • Rounded Edges: Select vent covers with smooth, rounded edges to minimize the risk of injury if touched or bumped.
 

Additional Tips for Maintaining Safety

  • Regular Inspections: Check vent covers regularly for signs of wear, loose screws, or shifting.
  • Supervise Toddlers: Teach children not to play with vent covers and ensure they are supervised in areas where covers are accessible.
  • Pet-Proof Solutions: Use deterrent sprays or floor mats to discourage pets from interacting with vent covers.
 

Combining Safety and Style

Safety doesn’t have to come at the cost of aesthetics. Modern flush vent covers and custom vent covers offer safe, durable solutions that blend beautifully with any home décor. These options not only keep your home safe for kids and pets but also enhance its visual appeal.

How to Match Vent Covers with Your Home Style

Why Matching Vent Covers with Décor Matters

Vent covers are often overlooked in home design, but they can either enhance or detract from your décor. A mismatched vent cover can disrupt the aesthetic flow of a room, drawing unwanted attention. By selecting custom vent covers or designs that complement your flooring and walls, you can create a cohesive look that elevates your space.

Key Elements to Consider for Matching Vent Covers

  • Material: Choose materials that align with your flooring or overall design theme. For example, wooden vent covers pair beautifully with hardwood or laminate floors, while metal covers suit modern or industrial interiors.
  • Color: Opt for vent covers that match or blend harmoniously with the room’s color palette. Neutral tones work well for subtle integration, while bold colors can be used for contrast in modern spaces.
  • Style: Consider whether you prefer flush mount vent covers for a minimalist look or decorative surface-mounted options for traditional settings.
 

Matching Vent Covers with Flooring

To ensure a seamless transition, choose vent covers that match your flooring type and finish:

  • Hardwood Flooring: Select custom vent covers that can be made from the same flooring material you use to match the exact tone and texture of your floors.
  • Tile or Vinyl Flooring: Use vinyl vent covers to match your flooring in terms of finish, color and texture and achieve a seamless finish.
  • Carpeted Areas: Opt for low-profile vent covers that don’t protrude, maintaining a clean and polished look.
 

Customization Options for Perfect Matching

Custom vent covers are the ideal solution for unique or hard-to-match interiors. These covers are designed to blend seamlessly with specific flooring materials and patterns, ensuring a flawless finish. Whether it’s a custom stain for wooden vent covers or a unique size for a flush mount design, customization offers limitless possibilities.

Tips for Coordinating Vent Covers with Other Décor

  • Match vent covers with baseboards or trim to create a unified appearance.
  • Use similar finishes across hardware elements (e.g., door handles, light fixtures, vent covers) for consistency.
  • For open-concept spaces, coordinate vent covers across adjoining rooms for a cohesive design.
 

Enhancing Style Without Sacrificing Functionality

A well-matched vent cover doesn’t just look good—it also performs well. Durable materials and proper fitting ensure optimal airflow while maintaining the aesthetic harmony of your space. Modern flush vent covers are especially popular for their ability to disappear into the flooring while maintaining practicality.

Conclusion

By now, you’ve learned that vent covers are much more than just functional elements—they’re integral to your home’s design, efficiency, and overall comfort. Whether you’re replacing outdated covers, upgrading to modern flush mount vent covers, or addressing safety and maintenance concerns, the right choices can make a noticeable difference. Taking the time to measure accurately, select the ideal materials, and install with care ensures a seamless blend of form and function.

As homeowners, it’s the attention to detail that turns a house into a home. Vent covers, often overlooked, are a prime example of how small upgrades can have a big impact. From improving airflow to matching your décor, they’re a key piece of the puzzle in achieving the perfect living space. If you’re ready to enhance your home further, consider the benefits of custom vent covers tailored specifically to your flooring and style. Your home deserves nothing less than the best, and with these tips, you’re now equipped to make that a reality.

Add comment

Your email address will not be published. Required fields are marked

from the blog

Related Articles